How to set up streaming (Tutorial)
Jul 24, 2014 20:36:07 GMT
Post by Jay on Jul 24, 2014 20:36:07 GMT
I know some of you can't stream for bandwidth reasons, but for anyone who can and wants to, but maybe doesn't know how or where to start. I'll be going it step by step on how to get starting and streaming online!
Step 1 - The Software.
Now, the only software you should be worrying about where it comes to streaming these days is OBS (Open Broadcaster Software) it's open source which means it free and easy to use!
Click here to download OBS
Step 2 - Setting up OBS
Now once you've downloaded the correct version of OBS, either x86 (32 bit) or x64 (64 bit) depending on your system, you're ready to get started. For the next steps of the tutorial, I'll be showing screenshots.
Before you change anything else, you'll be setting up a profile. Different profiles on OBS contain custom settings that are saved to the profile, not the program. Hench why I have one for Twitch and YouTube since they use different codecs and all that jazz.

To access the profile main, go over to settings, in the general tab will be selected by default.
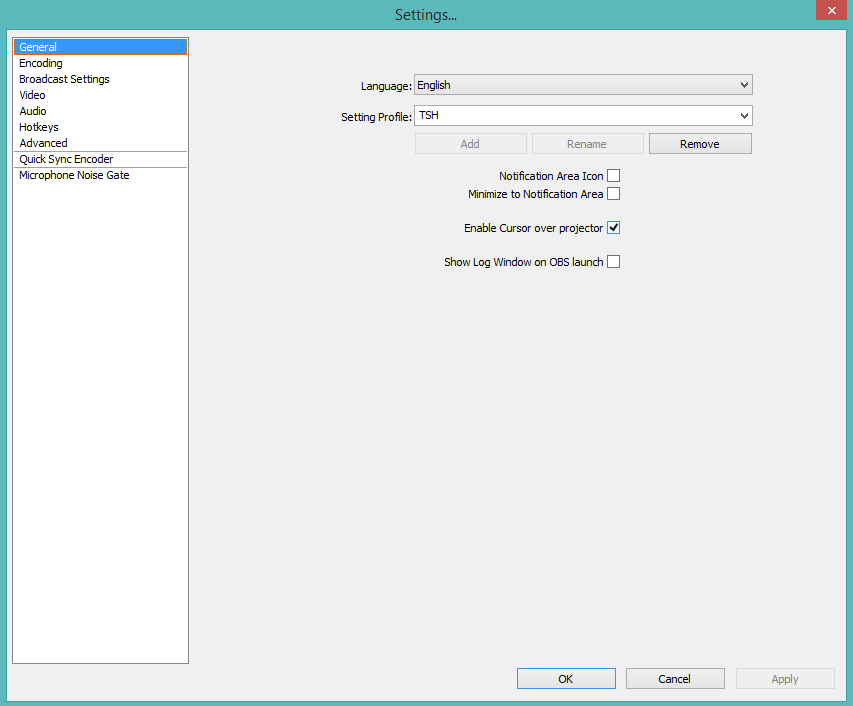
To add a new profile, simply edit the name of the currently selected profile, rename and click add, as shown. Now everything you change now, will apply to that profile, as long as you have it selected.
Step 3 - Encoding
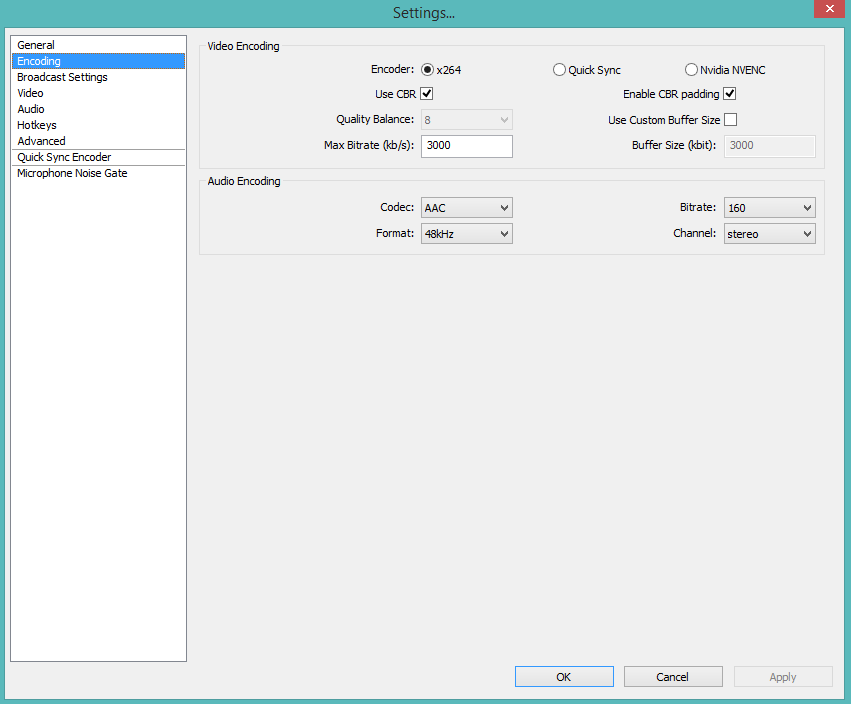
Copy all the settings in the encoding tab as shown. The only thing you need to adjust from time to time if you're having issues is the bitrate. The bitrate setting is linked to your upload speed, the bitrate displayed is 3mb/s or 3000kb/s. Make sure you find out what your upload speed is first before setting the bitrate as you don't want to tourette your connection and crash the stream!
If you have a upload speed above 5mb/s setting it to 5000 isn't smart, as it will up your entire connection and you'll begin to lag in-game. To put it into perspective, my upload speed is roughly 22mb/s which is 22000kb/s but there'll never be a reason to set it that high as viewers on Twitch will start to lag. It is recommended to have it between 2250 - 3200kb/s even on a connection like mine.
Step 4 - Broadcast Settings
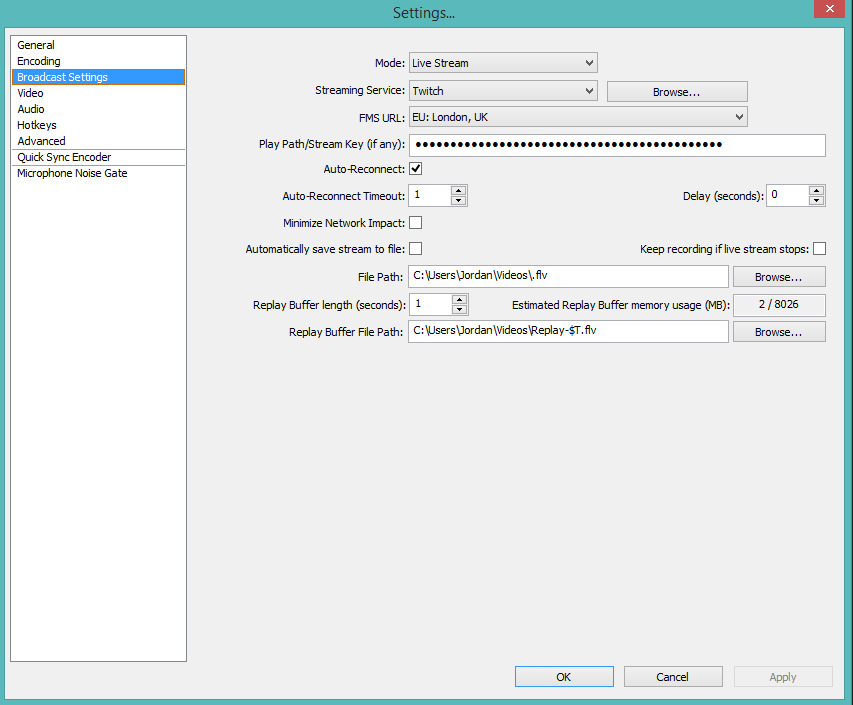
The only 2 important things on this page are the server and the stream key. There are 6 EU servers to choose from, obviously pick the one closest to you. Secondly, the stream key will be given you to via an email of your choice, so there's no need to physically sign into the account. However if streaming from your own account, you can find your streamkey by going to Twitch > Dashboard > Stream Key. As for the rest of the settings, copy them from the image and set hotkeys if you desire and a delay is also optional.
Step 5 - Video
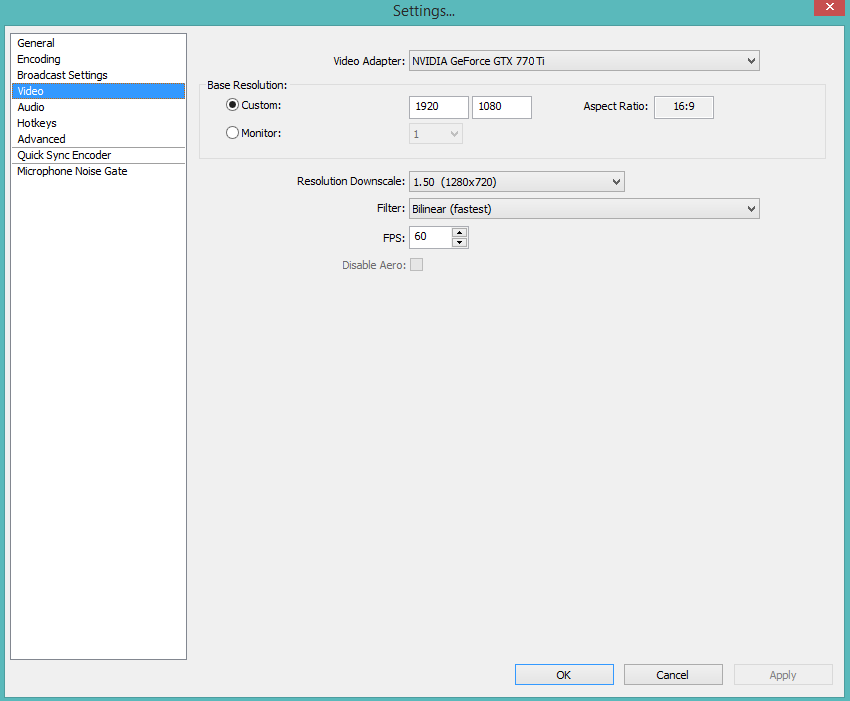
This is the only hardware intensive part to setting, depending on how powerful your PC is, you can adjust these settings to better match your PC, but be warned, the higher the resolution, the more bandwidth (upload speed) you'll need. I choose to stream in 1080p at 60fps as it delivers good quality without causing too many problems for me but, again adjust these settings according based on your bandwidth and PC.
Step 6 - Audio
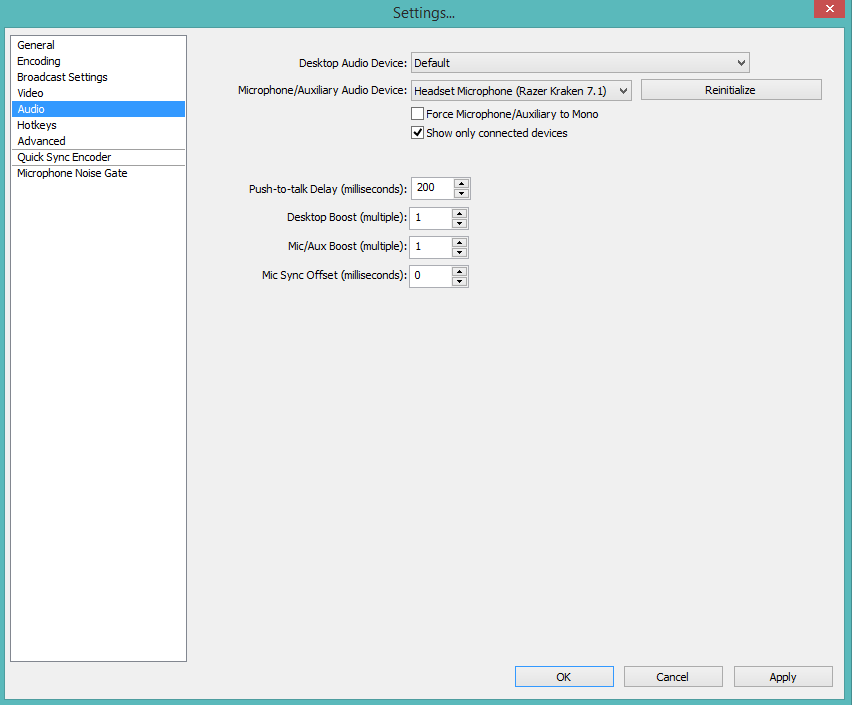
Audio is pretty straight forward, just select your microphone and leave the speakers as default, windows will automatically detect that for you. There are volume boost options to make either your microphone louder than the levels show or vice versa with the desktop, adjust these if either your game audio is louder than you or vice versa.
Step 7 - Advanced
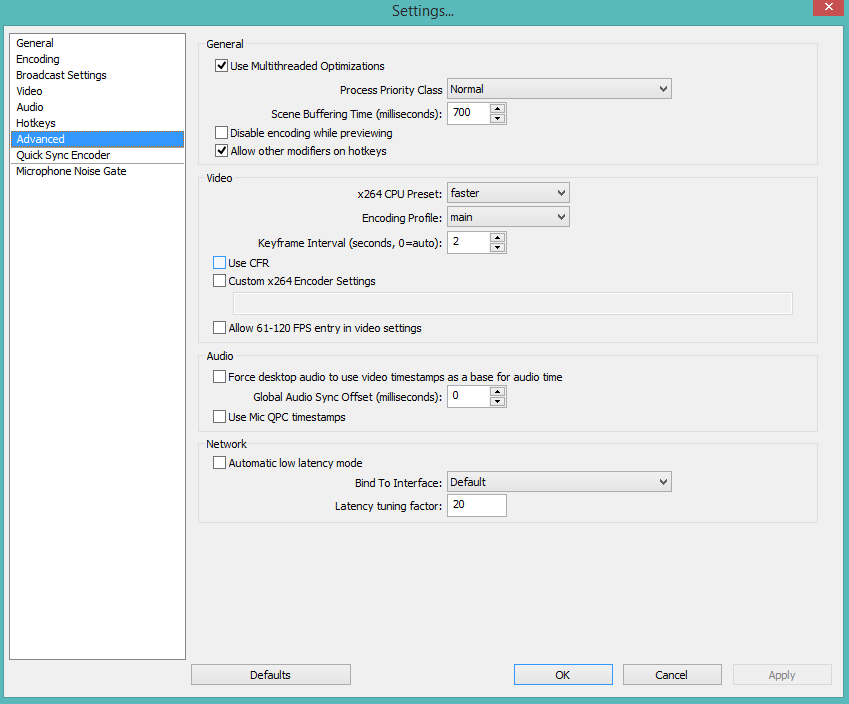
Copy everything from this page, the only option you can play around with is the "x264 CPU preset" it will give you slightly better quality but it does eat up your CPU quite a bit. I'd recommend "Very Fast" or "Ultra Fast" if you're running on an older machine or don't have an quad-core CPU. There isn't much of a differentence between Ultra and Very Fast, but an increase in quality on Very. I'd only recommend going to Faster if you can run that, anything beyond isn't necessary.
Just for Reference when adjusting this page, my CPU is a i5-4960k clocked at 4.10Ghz.
Step 8 - Overview
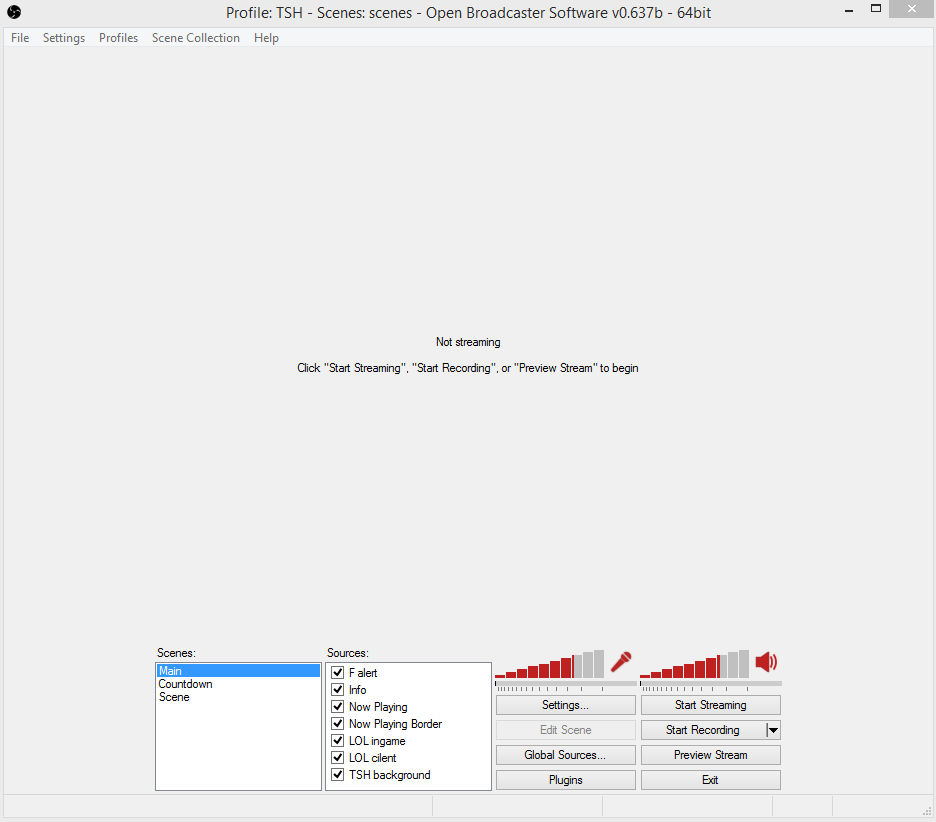
Now that you have all the settings ready for streaming, let's take a look at the UI, it's pretty basic, audio levels on the right, adjustable throughout streaming, scenes which are like folders and sources are like layers within the folder.
Note that nothing will be displayed in the panel until you even start streaming live or you can preview the stream locally to visually see and tweak things before you go live!
Step 9 - Adding Sources
To add a scene or a source, simply right click in the panel and select add. To capture League of Legends, you can choose from even Window Capture, which captures the window only (if you're playing in borderless or windowed) Monitor Capture, which captures the entire monitor or a region of the monitor, but things can overlap it. The recommended method is to use Game Capture as it only detects windows that are games, but you can play around with what works best for you!
Well that's pretty much it, the rest is up to you guys to play around with and find out what works best for you. I hope this was helpful and if you have any questions, let me know!
Step 1 - The Software.
Now, the only software you should be worrying about where it comes to streaming these days is OBS (Open Broadcaster Software) it's open source which means it free and easy to use!
Click here to download OBS
Step 2 - Setting up OBS
Now once you've downloaded the correct version of OBS, either x86 (32 bit) or x64 (64 bit) depending on your system, you're ready to get started. For the next steps of the tutorial, I'll be showing screenshots.
Before you change anything else, you'll be setting up a profile. Different profiles on OBS contain custom settings that are saved to the profile, not the program. Hench why I have one for Twitch and YouTube since they use different codecs and all that jazz.

To access the profile main, go over to settings, in the general tab will be selected by default.

To add a new profile, simply edit the name of the currently selected profile, rename and click add, as shown. Now everything you change now, will apply to that profile, as long as you have it selected.
Step 3 - Encoding

Copy all the settings in the encoding tab as shown. The only thing you need to adjust from time to time if you're having issues is the bitrate. The bitrate setting is linked to your upload speed, the bitrate displayed is 3mb/s or 3000kb/s. Make sure you find out what your upload speed is first before setting the bitrate as you don't want to tourette your connection and crash the stream!
If you have a upload speed above 5mb/s setting it to 5000 isn't smart, as it will up your entire connection and you'll begin to lag in-game. To put it into perspective, my upload speed is roughly 22mb/s which is 22000kb/s but there'll never be a reason to set it that high as viewers on Twitch will start to lag. It is recommended to have it between 2250 - 3200kb/s even on a connection like mine.
Step 4 - Broadcast Settings

The only 2 important things on this page are the server and the stream key. There are 6 EU servers to choose from, obviously pick the one closest to you. Secondly, the stream key will be given you to via an email of your choice, so there's no need to physically sign into the account. However if streaming from your own account, you can find your streamkey by going to Twitch > Dashboard > Stream Key. As for the rest of the settings, copy them from the image and set hotkeys if you desire and a delay is also optional.
Step 5 - Video

This is the only hardware intensive part to setting, depending on how powerful your PC is, you can adjust these settings to better match your PC, but be warned, the higher the resolution, the more bandwidth (upload speed) you'll need. I choose to stream in 1080p at 60fps as it delivers good quality without causing too many problems for me but, again adjust these settings according based on your bandwidth and PC.
Step 6 - Audio

Audio is pretty straight forward, just select your microphone and leave the speakers as default, windows will automatically detect that for you. There are volume boost options to make either your microphone louder than the levels show or vice versa with the desktop, adjust these if either your game audio is louder than you or vice versa.
Step 7 - Advanced

Copy everything from this page, the only option you can play around with is the "x264 CPU preset" it will give you slightly better quality but it does eat up your CPU quite a bit. I'd recommend "Very Fast" or "Ultra Fast" if you're running on an older machine or don't have an quad-core CPU. There isn't much of a differentence between Ultra and Very Fast, but an increase in quality on Very. I'd only recommend going to Faster if you can run that, anything beyond isn't necessary.
Just for Reference when adjusting this page, my CPU is a i5-4960k clocked at 4.10Ghz.
Step 8 - Overview

Now that you have all the settings ready for streaming, let's take a look at the UI, it's pretty basic, audio levels on the right, adjustable throughout streaming, scenes which are like folders and sources are like layers within the folder.
Note that nothing will be displayed in the panel until you even start streaming live or you can preview the stream locally to visually see and tweak things before you go live!
Step 9 - Adding Sources
To add a scene or a source, simply right click in the panel and select add. To capture League of Legends, you can choose from even Window Capture, which captures the window only (if you're playing in borderless or windowed) Monitor Capture, which captures the entire monitor or a region of the monitor, but things can overlap it. The recommended method is to use Game Capture as it only detects windows that are games, but you can play around with what works best for you!
Well that's pretty much it, the rest is up to you guys to play around with and find out what works best for you. I hope this was helpful and if you have any questions, let me know!


